
Short Sectional Columns Part 1
Overview
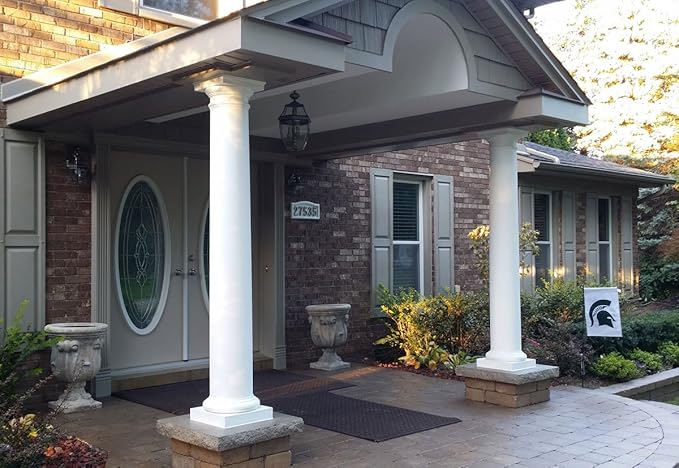
Short sectional columns. Are you considering cast stone columns for the front porch or patio deck of your property? Are you a DIYer with just a few skills? Does the cost seem out of reach? Then perhaps the following post will really be of interest to you. I have noticed how high the interest has been in the topic of columns. So I started to look at the task as if I were starting out again, knowing the challenges and costs that I came across, and what I might have done differently. And how I could present this type of project to a DIYer or a handyman.

There are many facets to columns, from concept to installation, and I could see that it might be overwhelming for most. So hopefully this first post will simplify and encourage more of you to take on the challenge of a columns project, and you will have one additional bonus that I didn’t have, that’s me, available to answer any questions and offer advice.
As an Amazon Associate, I earn from qualifying purchases
This post contains affiliate links. If you make a purchase through these links, I may earn a commission at no extra cost to you.
If you have looked for any form of stone columns, you would have seen that most come in long lengths or you order them to a custom overall length. Most have hollow cores to accommodate steel or wooden posts, especially those on front porches.

So considering short sectional columns and the following methods it should be something that you can achieve with the minimum amount of skill, tools and materials. It will be even easier if you limit yourself to simpler designs for the bases and caps.
After reading through all these basic details on short sectional columns I will add some variations and techniques for some sections of this post at the bottom.
1. The Design and Mold Creation of Short Sectional Columns:
- Conceptualization: Determine the desired size, shape, and style of the column. Square or round would be the easiest and straight shafts for your first project.
- Mold Creation: Construct individual mold for just one half section, maybe a pair of the column shaft, to your pre-calculated equal height, thus ensuring precise alignment and fit.
- Base and Caps: At least one additional mold for a single square cap and base or 2 which will create a simple stepped double detail. Feeling more adventurous then make the 2nd one round. If going around any post make sure these are made in 2 as well. Or you can just place a piece of thin material at the center point of your mold so that you will actually making 2 pieces that have no choice but to align perfectly.
- Material Selection: Choose a suitable mold materials. likea smooth waterproof plywood for the base & caps. The shafts could be the same plywood if square and off cuts of large underground PVC pipes for round style. I will explain various methods of how you could achieve this in the 2nd post.
- A Core: If you need to go around and steel, wood or you want to pour a solid core later then you need a removable core at the mold stage too. This needs to be easy to install while pouring the piece, and easy to take out after curing.
2. Preparing For Casting the Short Sectional Columns:
- Mold Preparation: Prepare the molds by applying a release agent to prevent sticking. This needs to be on the core too.
- Stop Ends: Install stop ends to each end of the shaft mold allow for easy fitting of your core mold too. Make sure these fit snugly has wet mixes have a habit of finding any little holes, nowhere near as bad as silicone or resins, but enough to make a mess of things and affect the quality of finish of the final piece.
- Depending on the Finish: If you do not require a really smooth finish, then less work is required to the inside finished surfaces of your molds. I would recommend a textured finish as it covers most small imperfections.
3. Concrete Mixture Preparation:
- Mixing Technique: Thoroughly mix the ingredients to achieve a consistent and workable mixture.
- Reinforcing: The use of non-ferrous reinforcing is the way to go, concrete fibers or fiberglass rebar or both.
- Ingredient Selection: Select high-quality cement, aggregates (sand and gravel), and water.
- Color Pigmentation: Add pigments to the mixture to achieve the desired color or finish.
- Pouring the Mixture: Carefully pour the concrete mixture into the molds, ensuring even distribution.
- Vibration: Vibrate the molds to eliminate air bubbles and achieve a dense, solid cast.
- Curing: Allow the cast sections to cure properly, either naturally or in a controlled environment.
4. Demolding and Finishing:
- Demolding: Carefully remove the cast short sectional columns from the molds, ensuring they are fully cured.
- Finishing: Sand, grind, and polish the sections to achieve the desired surface finish or to clean up the seam area prior to installation.
- Alignment: After the first 2 halves are poured dry set them up together to check for any issues. Make any required adjustments to your molds before continuing. And go through this step again until you get it right as alignment at the installation stage is critical.
- Ageing and Patination: Apply ageing techniques, such as acid washing, to achieve a specific look.
5. Before Installation:
- Existing Supports: Are the existing steel or wooden posts in good condition? Replace if not.
- Foundations: Is the existing foundation large or strong enough to support your new columns?
- Measurements: Double-check all your overall measurements including allowing for joints.
6. Installation of Your Short Sectional Columns and The Finishing Touches:
- Installation: Install the assembled column pieces in their final locations. Base pieces first and allow them to set up at least overnight, align these correctly at the base and allow for any deviations at the top area (soffit). This should also include the correct positioning for any steel or wood supports in the core.
- Shafts: Start now with the shafts, set your first 2 halves using a Thinset mortar or maybe an epoxy, use shims to level as necessary, and don’t forget to remove the shims and rake out any excess jointing material to allow for the final grouting. Keep going with your sections checking your gauge to make sure you will have enough room for your capital pieces. Once you have installed all your sections and cap pieces, let them dry overnight.
- Grouting: Grouting of your short sectional columns is just as important as the installation of your pieces, if not more so. If possible, buy a bag of a suitable colored mortar, or make up your own dry colored mix, more that you think you need and draw down from your stockpile to keep your coloring consistent. There are some ceramic/porcelain sanded grouts that may be suitable. How to apply your grout can be a little challenging so practice a little first. The easiest way is to use a grout bag and a nice creamy mix of grout. A strong plastic bag with a corner cut off, or the cake piping bag from the kitchen make great alternates.
- Sealing and Protection: At a later date after sufficient drying time, you may wish to seal your columns and joints to protect them from the elements. There are many sealants, the penetrating type is the best in my opinion as they don’t change the look or color very much at all. If you seal them too heavily, you won’t get much of the natural patina that develops over time without sealer.
- Final Touches: If you were planning on a painting with a faux finish, now would be the stage to do this, to complete the look.
Conclusion
By following these steps and paying attention to detail, you can create stunning cast stone short sectional columns that add elegance and character to any space. This can be achieved without the monstrous column shaft molds and the associated expenses and by just an average DIYer with limited tools and materials.
If this approach to making your own columns appeals to you then I will be creating a 2nd post explaining a lot of the possible variations and techniques to either make the whole process even easier or more suitable to your skills or materials at your disposal.
Future Post Talking Points.
Below is a short list of just some of those topics that I intend to cover, if you can’t wait and need to get started after reading this first post, then get in contact with me and I will help you with any particular part you need help with.
Alternate designs/styles
Newell posts
Mold variations
More complex capitals
Concrete mixes
Textures
Installation variations
Solid core/structural potential.
Sketches with explanations
Contact Us
We hope you find the information useful, but if you have any questions or need help, send us a message. You do have to sign in and confirm these days to comply with government rules. Sorry for the inconvenience.
Author Rob


This is a fantastic introduction to sectional columns! I love how you’ve broken down the key elements and highlighted the benefits of using short sectional columns by DIYers and handymen. The detailed explanations make it easy to understand how they contribute to aesthetics. I’m looking forward to part 2 of this series—this is valuable information for anyone in the building and design industry. Thanks for sharing these insights!
Hi Mery,
I thank you for your comments, and I am happy that you can see the benefits of how people with basic skills can take on a project like this. Rob