
How to Build a Mold Box: Reducing Waste and Improving Mold Performance
Table of Contents
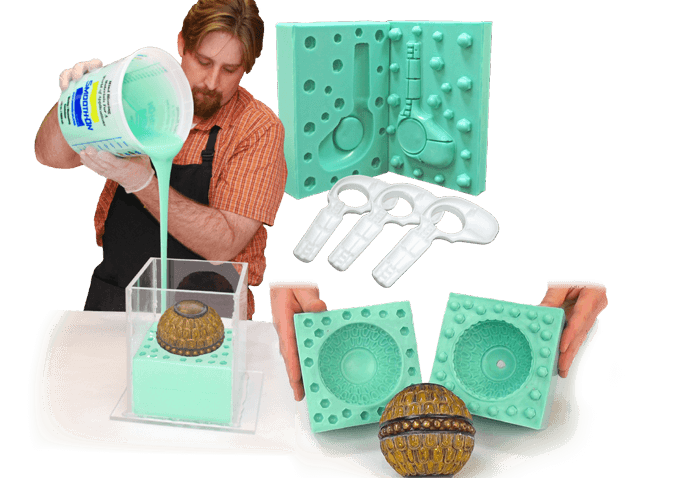
Silicone mold making is often introduced as a simple pour-and-wait process. In practice, the quality, durability, and cost-effectiveness of a mold are determined long before silicone is mixed. Mold box design, wall thickness, clearance, and how quickly the mold needs to go into production all play a significant role in the final result.
This article focuses on efficient mold box setup, with particular attention to material use, geometry, and common avoidable mistakes. The aim is not to explain whether molds can be made, but how to set them up correctly from the start.
Choosing the Right Silicone for Mold Making
For most craft and small production applications, two-part silicones formulated specifically for mold making should be used. Platinum-cure silicones are widely preferred due to their stability, accuracy, and predictable curing behavior when mixed correctly.
General-purpose construction sealants and household silicones are not suitable for this type of mold making. They cure inconsistently, lack dimensional stability, and often result in poor surface detail and reduced mold life.
Silicone selection should always match the intended use. Most manufacturers or suppliers can advise on this topic if you are unsure. For many small decorative or cast stone applications, a general-purpose mold-making silicone of moderate softness is sufficient and forgiving to work with, particularly when it comes to demolding.
Mold Box Construction and Material Choice
A mold box should be built to follow the external shape of the model as closely as practical, leaving an even and controlled wall thickness on all sides. Oversized boxes waste silicone and create uneven mold wall thicknesses, which can lead to distortion and premature failure during use.
Smooth, sealed materials such as melamine-coated board, acrylic sheet, or sealed MDF are recommended for mold box construction. Bare wood and porous materials increase adhesion and complicate demolding.
At this stage, consideration should also be given to future use. If the mold is intended for repeated or planned production, it is often worth building the mold box from thicker, more rigid materials. This allows the cured silicone mold to be returned to the box accurately and supported during casting. Maintaining a level backing to the silicone mold becomes more important in these cases.
An added advantage is that, depending on the production material being used, the mold box can also act as formwork. This allows cast material to be screeded or leveled accurately during production runs.
Where possible, filler pieces should be added to areas of the mold box. These reduce dead volume, improve silicone flow, eliminate sharp internal angles, and make cured molds easier to remove and handle. They can also act as locating features if they are not symmetrical when placing the mold back into its box.
A new, suitable base board made from a strong, smooth material is always recommended. The mold box and model should be sealed down to this level base using an appropriate sealant. This prevents leakage of liquid silicone and keeps both the box and model firmly in place during pouring and curing.
Wall Thickness and Top Clearance
Minimum silicone thickness is more important than excessive mass. For small molds, maintaining a minimum wall thickness of approximately 10 to 12 mm at the narrowest point provides sufficient strength without unnecessary material use. This is the same thickness commonly recommended when producing silicone glove molds, a subject that can be explored in more detail separately.
Top clearance above the highest point of the model should be deliberate and consistent. Insufficient coverage weakens the mold and increases the risk of tearing during demolding or later use.
Planning wall thickness and clearance before mixing silicone reduces waste and improves mold longevity.
Mixing and Pouring Technique
Silicone should be mixed strictly according to the manufacturer’s specified ratio, with careful attention paid to scraping the sides and base of the mixing container to ensure complete blending. Some products are mixed by volume, others by weight, and this should always be confirmed before starting. Even products from the same manufacturer can vary.
Pouring should be done slowly from a single point, allowing the silicone to flow naturally around the model. This reduces the likelihood of trapped air as the silicone works its way up the sides of the model and promotes even coverage. Excessive pouring from height, directional pouring from multiple points, pouring directly onto the model before the sides have filled, or aggressive movement is more likely to introduce bubbles and should be avoided.
Bubbles trapped on the surface become pockets in the mold’s surface. Bubbles within the main body of the silicone can weaken the mold and reduce its service life.
The volume mixed should closely match the calculated cavity size. Overmixing not only wastes material but often leads to rushed pours and inconsistent results. As a precaution, it is sensible to have a second set of clean mixing containers and tools ready in case additional volume needs to be added to complete the pour.
Safety and Ventilation Considerations
While many modern mold-making silicones are now low in odor, ventilation should always be considered. Some products can still release fumes during mixing or curing.
Disposable gloves and eye protection are recommended during mixing and pouring. A working apron or older work clothes are advisable, as silicone readily adheres to fabric. In confined or poorly ventilated spaces where suitable extraction cannot be employed, the use of a respirator or mask designed for chemical vapors is good practice. Avoid prolonged exposure and allow adequate curing time before handling.
Common Setup Errors to Avoid
Several issues are repeatedly seen in mold construction that lead to excessive material waste, failed pours, or short-lived molds, often resulting in mold loss, or unnecessary rework and additional labour:
• Oversized mold boxes requiring excessive silicone volume
• Insufficient top cover or wall thickness
• Inadequate filler pieces, around the model’s perimeter
• Poor surface sealing of mold-box materials
• Poor fixing or sealing of the mold box or model to the base
• An unlevel base or workbench
• Out-of-date or improperly stored silicone
These errors are avoidable with basic planning and attention to detail, saving both time and materials.
Closing Note
Efficient mold making is not about shortcuts. It is about control. Careful planning and mold box design, realistic material planning, and the correct silicone and handling lead to stronger molds, reduced waste, and more consistent results and mold shelf life.
For operations producing multiple molds or working with higher-value materials, time spent on setup accuracy pays for itself very quickly.
If you have any questions about a specific piece, or would like a second set of eyes on your mold box configuration before committing silicone, you’re welcome to get in contact. A quick review at the planning stage often avoids unnecessary material use and setup issues later on.
Author: Robby
Cast Stone Pro


Leave a Reply