
Beginner’s Guide To Using Resin
A beginner’s guide to using resin for resin crafting projects is like opening a door to endless creative possibilities. Imagine turning clear, gooey liquid into shiny, rock-hard pieces of art – that’s resin for you! From intricate jewelry to stunning home decor, resin crafting lets you create unique and beautiful things that can’t be easily made using other materials.

One of the best parts? You don’t need a degree in art or years of experience to get started. Resin crafting is super beginner-friendly. Many people choose it as a new hobby because it combines creativity and relaxation, plus you get to show off some seriously cool pieces when you’re done.

An Incredible Array Of Projects
Another big plus is the versatility. Whether you’re into making coasters, keychains, or even furniture, you can find a resin project that suits your style and interests. It’s like the Swiss Army knife of crafting materials – ready to transform whatever you dream up.
The community around resin crafting is also fantastic. There are tons of online groups, tutorials, and resources where fellow enthusiasts share tips, tricks, and inspiration. You’re never alone on this journey, and you’ll find plenty of support no matter what level you’re at.
It’s also worth mentioning that resin crafting can be as affordable or as splurge-worthy as you want it to be. Many beginners find that they can get started with a modest budget, and expand their toolkit as they go. So, no need to break the bank right off the bat.
In short, if you’re looking for a hobby that’s as rewarding as it is fun, resin crafting checks all the boxes. You’ll soon see why so many people have fallen in love with this versatile and creative craft. Ready to get your hands a little messy? Let’s jump in!
A Beginner’s Guide To Using Resin And The Essential Tools and Equipment
A successful resin crafting venture starts with having the right tools at your disposal. Having the right tools is essential and will make your crafting easier, smoother and more enjoyable.

First up, mixing cups and stirring sticks. You’re going to need these to mix your resin and hardener properly. Proper mixing ensures your resin cures correctly, giving you a sturdy finished product. Disposable options are great because they make clean-up a breeze. But saving the stronger and larger empty yoghurt pots are great too. “A little pro tip” wipe all your containers inside and around the top edges with a mold release wax. Then the following day you can pop out the dried remains of resin.
Next, weighing scales. digital is best. Accuracy is key in resin crafting. Measuring your resin and hardener by weight rather than volume ensures you get the ratios right. This step is crucial for achieving that perfect finish and is the normal method for most resin systems.
A Beginner’s Guide To Using Resin And Safety Considerations
A beginner’s guide to using resin would not be complete without explaining the need for safety and what safety gear you will need. – disposable gloves, masks, and goggles or safety glasses. Having a suitable apron is very useful too.Resin can be pretty sticky and some resin products release fumes that you really don’t want to inhale, so you might want to consider a more commercial mask with changeable filter cartridges. Protecting your skin and lungs is a must. Remember, safety first!
Don’t forget about the workspace. A well-ventilated and level surface is necessary for your crafting area. Cover your workspace with disposable table covers or silicone mats to catch any spills. Resin can get everywhere, and a protected surface means fewer headaches cleaning up.
Optional tools, like heat guns or torches, can help pop any pesky bubbles that appear in your resin. While not strictly necessary when starting out, they can make a big difference in the quality of your finished pieces. Plus, they’re just plain fun to use.
Lastly, having a dedicated storage area for your materials will help keep everything organized. Resin and hardeners should be stored properly to ensure they stay fresh and ready to use. A clutter-free workspace makes crafting way more enjoyable and efficient.
Getting your hands on these basic tools will set a solid foundation for your resin crafting journey. With the right gear, you’re all set to create something amazing!
Understanding Different Types of Resin
Navigating the world of resins can be like picking out candy in a sweet shop – so many options! Let’s break down the most common types you’ll encounter as a beginner: epoxy, polyester, and UV resin. Always check the working and curing times of any product. Some only give you a few minutes.
Epoxy resin is the superstar of the resin world, especially for beginners. It’s user-friendly and versatile. You mix two parts together – resin and hardener – and you’re good to go. It’s great for making jewelry, coasters, and other small projects. Plus, it doesn’t have a strong odor, which is a huge plus if you’re crafting indoors.
Polyester resin might be the wild cousin of epoxy. It’s harder to work with and can be a bit smelly, so good ventilation is crucial. However, it cures much faster and is super strong, making it ideal for larger projects like furniture or sculptures. Beginners usually shy away from this one, but it’s worth knowing about as you advance.
UV resin is like the sprinter in the resin race. It cures rapidly when exposed to UV light. Perfect for small projects and quick fixes, it’s a favorite for jewelry makers. No mixing required – just pour and cure under a UV lamp or the sun! However, it’s not ideal for larger projects due to its shallow curing depth.
Choosing the right resin depends on your project. If you’re aiming for simpler, smaller creations, epoxy resin is your best bet. If you pursue this craft then you might experiment with polyester resin and larger, more complicated pieces as you get more comfortable. UV resin is your go-to for quick, small designs.
Understanding these basic types will help you strike the perfect balance between creativity and functionality in your crafts. Armed with this knowledge, you’re one step closer to creating masterpieces that reflect your unique style.
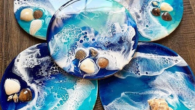
Finding or Making Your Perfect Mold
Finding the right mold is like finding the perfect model for a painter. Pre-made silicone molds are readily available and come in various shapes and sizes. Trusted retailers like craft stores, online marketplaces, and specialized resin supply shops offer a wide selection. Silicone molds are the best because they’re flexible and allow for easy demolding, have a long life span ( library life) and replicate the fine details of the mold each time.
If you’re feeling adventurous, making your own custom mold opens up endless possibilities. Start with simple objects around your home that you wish to replicate. Food-grade silicone or liquid latex can be used to create custom molds. Imagine making a mold out of a unique shell you found at the beach or a vintage trinket you love.
Creating a mold isn’t as complicated as it might sound. And you can refer to another post here on silicone mold making. Making your own mold is a fantastic way to create unique pieces that can’t be found in stores.
Whether purchasing or DIY-ing your molds, investing time in selecting the right one can elevate your resin crafting. Tailoring molds to your projects not only boosts creativity but makes the crafting process more exciting and personal.
Creating Your First Resin Piece
Starting your very first resin piece might feel a bit daunting, but with a step-by-step approach, it becomes a fun and rewarding process. Let’s walk through making a simple resin pendant.
Begin by gathering all your supplies: epoxy resin, hardener, mixing cups, stirring sticks, gloves, a mask, a silicone mold for a pendant, and any embellishments like glitter or dried flowers. Having everything ready before you start makes the process much easier.
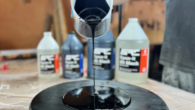
Measure and mix your resin and hardener according to the instructions. Pour equal parts into the mixing cup, then stir slowly and thoroughly for the recommended time. Slow stirring minimizes air bubbles that can affect the clarity of your finished piece.
Slowly pour a thin layer of mixed resin into your mold, just enough to cover the bottom. Add your chosen embellishments, arranging them however you like. If you’re using items like dried flowers, tweezers can help with precise placement.
After placing your embellishments, slowly pour another layer of resin to fill the mold. Depending on how thick your piece is it may need at least 1 more slow-poured level. Pouring slowly and in layers helps to release any air. Use a heat gun briefly to pop any bubbles that appear on the surface. Be careful not to overheat, as this can damage the resin.
Let your pendant cure fully according to the resin’s time instructions. This step is all about patience. Once cured, gently remove your pendant from the mold. Sand the edges if needed for a smoother finish, and attach a jewelry finding to turn your pendant into wearable art.
Creating your first resin piece is about enjoying the process and learning as you go. Each step helps build your confidence and skills, leading to more complex and rewarding projects.
Contact Us
We hope you find the information useful, but if you have any questions or need help, send us a message. You do have to sign in and confirm these days to comply with government rules. Sorry for the inconvenience.
Author Rob


Hey there, your guide to using resin really opened my eyes to the endless possibilities of this craft! I loved the part where you broke down the types of resin and their specific uses. Could you dive deeper into the pros and cons of epoxy versus UV resin, especially for outdoor projects? Also, your safety tips were super helpful! Any chance you could share some personal stories or blunders you’ve had while working with resin to give us newbies a real-life perspective? Lastly, how do you stay inspired to come up with new project ideas? Thanks for sharing such valuable content!
GJ
I have seen a lot of YouTube videos on using or making things with resin. It looks really awesome and so different when it sets. Can you pretty much use anything to put in the resin. Like if I wanted to add a flower or something like that or a special rock from my granddaughter. Would things like that work? Also would resin projects just be for smaller projects or how large of a project could one do with resin? Even though I have seen the YouTube videos, they are not tutorials but ones that my granddaughter watches like on SSSniperwolf or other YouTubers like that.
Just curious about that. Also, I live in cold Minnesota and would resin stand up to cold temperatures and snow or would that be something you would want to store away in the winter?
Thanks. I look forward to hearing your reply.
Karin 🙂
Hi Karin, And thank you, As far as encapsulating an item yes, virtually anything can be used.
Today’s resins are so much better formulated, but in their raw state they do prefer to be kept at a decent room temperature is best officially 40-95 F is recommended for most resins.
But I don’t like to push my stored items to their outer limits. So keep them in doors, and its a perfect craft for the winter months